Reservation Widget
The reservation widget allows you to provide end users on your website the possibility to book a spot in your restaurant. The widget can be integrated as a simple link, with HTML code or iframe directly on your website or as button that opens the widget on your website.
Preparations
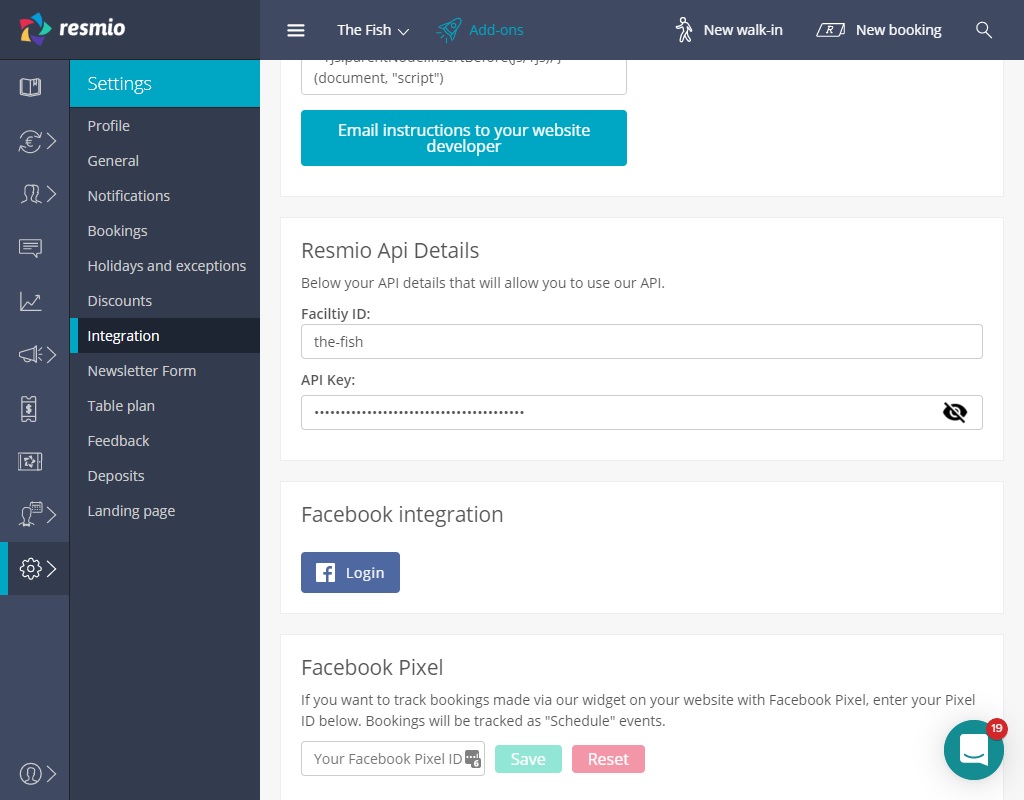
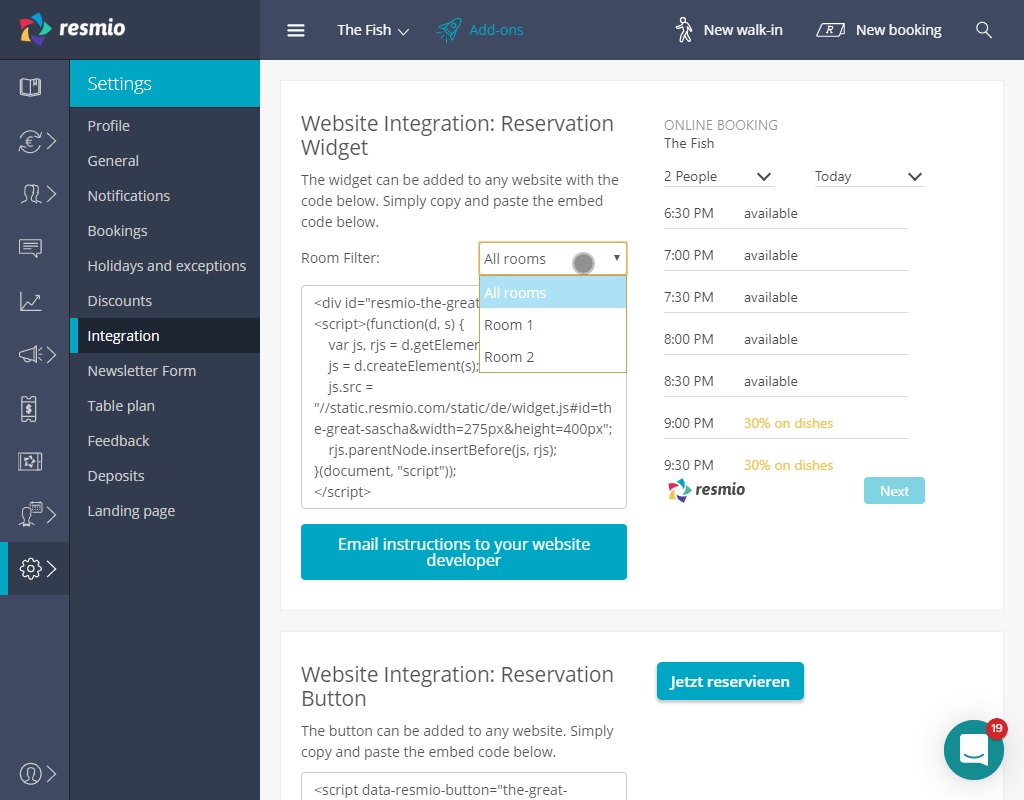
You will need your facility ID, that identifies your facility in resmio. The facility ID can be found easily. Login to
app.resmio.com and go to Settings -> Integration and scroll down to Resmio Api Details
as shown on the image below.
Integration as Link
If you want you can create and style an own link or button and then link it to your widget url on resmio.
The url that you will need is:
https://app.resmio.com/FACILITY_ID/widget
Replace all occurrences of FACILITY_ID with your facility ID.
You can also provide a source parameter to specify the source of the reservation if you want to include the widget on multiple websites. You can do so with the source parameter as shown below:
https://app.resmio.com/FACILITY_ID/widget?source=SOURCE
Replace all occurrences of FACILITY_ID with your facility ID and SOURCE with any url escaped string.
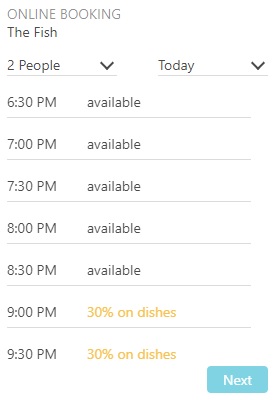
Integration as Widget
You can directly load the widget on your website. It will look like this:
Setup
You can integrate the widget with the following HTML code.
<div id="resmio-FACILITY_ID"></div>
<script>(function(d, s) {
 var js, rjs = d.getElementsByTagName(s)[0];
 js = d.createElement(s);
 js.src = "//static.resmio.com/static/de/widget.js#id=FACILITY_ID&width=275px&height=400px";
 rjs.parentNode.insertBefore(js, rjs);
}(document, "script"));
</script>
Replace all occurrences of FACILITY_ID with your facility ID and put that code somewhere within your <body></body> tag.
Modify: Filter by resourceGroup
If you have have multiple rooms and maybe only want to allow users to reserve online for one of your rooms, you can create a dedicated widget just for this room by adding a resourceGroup filter to the code above as shown below:
...
 js.src = "//static.resmio.com/static/de/widget.js#id=FACILITY_ID&width=275px&height=400px&resourceGroup=RESOURCE_GROUP_ID";
...
Replace all occurrences of FACILITY_ID with your facility ID and RESOURCE_GROUP_ID with the id of your room.
You can use the reservation widget configurator to find out the proper ID and even generate the complete reservation
widget code for this room as shown below:
Modify: Customizing the width and height
The widget can be customized to use a different width and height. Customize the code as shown below:
...
 js.src = "//static.resmio.com/static/de/widget.js#id=FACILITY_ID&width=800px&height=600px";
...
Replace all occurrences of FACILITY_ID with your facility ID
Modify: Background color and font color
The widget can be customized to use a different background color and font color. Customize the code as shown below:
...
 js.src = "//static.resmio.com/static/de/widget.js#id=FACILITY_ID&width=275px&height=400px&backgroundColor=60493b&color=ffffff";
...
Replace all occurrences of FACILITY_ID with your facility ID. The colors are in HEX representation.
Modify: Link and action button color
The widget can be customized to use a different link and action button color. Customize the code as shown below:
...
 js.src = "//static.resmio.com/static/de/widget.js#id=FACILITY_ID&width=275px&height=400px&linkBackgroundColor=7bc7b3";
...
Replace all occurrences of FACILITY_ID with your facility ID. The colors are in HEX representation.
Modify: Default value for the name field
The widget can be customized to fill out the name with a default value. Customize the code as shown below:
...
 js.src = "//static.resmio.com/static/de/widget.js#id=FACILITY_ID&width=275px&height=400px&name=example";
...
Replace all occurrences of FACILITY_ID with your facility ID.
Modify: Default value for the email field
The widget can be customized to fill out the email with a default value. Customize the code as shown below:
...
 js.src = "//static.resmio.com/static/de/widget.js#id=FACILITY_ID&width=275px&height=400px&email=test@example.com";
...
Replace all occurrences of FACILITY_ID with your facility ID.
Modify: Default value for the phone field
The widget can be customized to fill out the phone with a default value. Customize the code as shown below:
...
 js.src = "//static.resmio.com/static/de/widget.js#id=FACILITY_ID&width=275px&height=400px&phone=041315804988";
...
Replace all occurrences of FACILITY_ID with your facility ID.
Modify: Default value for the comments field
The widget can be customized to fill out the comments with a default value. Customize the code as shown below:
...
 js.src = "//static.resmio.com/static/de/widget.js#id=FACILITY_ID&width=275px&height=400px&comment=Birthday";
...
Replace all occurrences of FACILITY_ID with your facility ID.
Modify: Hide comments field
The widget can be customized to hide the comments field. Customize the code as shown below:
...
 js.src = "//static.resmio.com/static/de/widget.js#id=FACILITY_ID&width=275px&height=400px&commentsDisabled=1";
...
Replace all occurrences of FACILITY_ID with your facility ID.
Modify: Uncheck newsletter subscribe field
The widget can be customized to uncheck the newsletter subscribe field. Customize the code as shown below:
...
 js.src = "//static.resmio.com/static/de/widget.js#id=FACILITY_ID&width=275px&height=400px&newsletterSubscribe=false";
...
Replace all occurrences of FACILITY_ID with your facility ID.
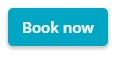
Integration as Button
Sometimes your theme has no proper position for this widget. Then you can use the button integration to create a button on your website that will open the widget in an overlay. It will look like this:
and when you click it, it will open the widget in an overlay as shown below:

Setup
You can integrate the widget as button with the following HTML code.
<script data-resmio-button="FACILITY_ID">
  (function(d, s) {
 var js, rjs = d.getElementsByTagName(s)[0];
 js = d.createElement(s);
 js.src = "//static.resmio.com/static/en/button.js";
 js.async = true;
   rjs.parentNode.insertBefore(js, rjs); }(document, "script")
  );
</script>
Replace all occurrences of FACILITY_ID with your facility ID and put that code somewhere within your <body></body> tag.
Modify: Filter by resourceGroup
If you have have multiple rooms and maybe only want to allow users to reserve online for one of your rooms, you can create a dedicated widget just for this room by adding a resourceGroup filter to the code above as shown below:
<script data-resmio-button="FACILITY_ID" data-resmio-resourcegroup="RESOURCE_GROUP_ID">
...
Replace all occurrences of FACILITY_ID with your facility ID and RESOURCE_GROUP_ID with the id of your room.
You can use the reservation widget configurator to find out the proper ID of the room.
Modify: Setting a language
The button can be loaded in multiple languages. You can adjust the language with the language parameter in the js.src line as shown below:
...
 js.src = "//static.resmio.com/static/LANGUAGE/button.js";
...
Currently the supported languages are:
- English: en
- Danish: da
- German: de
Modify: Styling the button
The button can be styled with the following CSS as shown below:
<style type="text/css">
.resmio-button .btn {
  background-color: #002547;
  background-image: linear-gradient(top,#04539c,#011a32);
  background-image: -webkit-linear-gradient(top,#04539c,#011a32);
  background-image: -o-linear-gradient(top,#04539c,#011a32);
  background-image: -moz-linear-gradient(top,#04539c,#011a32);
  background-image: -ms-linear-gradient(top,#04539c,#011a32);
  border-style: 1px solid #633613;
  border-color: #002547;
}

.resmio-button .btn:hover, .resmio-button .btn:focus {
   background-color: #011a32;
   background-image: linear-gradient(top,#c09e82,#8c6a50);
   background-image: -webkit-linear-gradient(top,#c09e82,#8c6a50);
   background-image: -o-linear-gradient(top,#c09e82,#8c6a50);
   background-image: -moz-linear-gradient(top,#c09e82,#8c6a50);
   background-image: -ms-linear-gradient(top,#c09e82,#8c6a50);
   border-style: 1px solid #49260a;
   border-color: #011a32;
}
</style>
Integration as iframe
Sometimes your website provider does not allow allow your custom JavaScript code on your website, then you can use an iframe to show the widget on your website. The iframe code would look like this:
<iframe src="https://app.resmio.com/FACILITY_ID/widget" width="275" height="400"> </iframe>
Replace all occurrences of FACILITY_ID with your facility ID. The width and height of the iframe can be adjusted according to your need.
As shown already above for the link, you can also provide a source for your bookings. This is useful if you want to integrate the widget on multiple websites
<iframe src="https://app.resmio.com/FACILITY_ID/widget?source=SOURCE" width="275" height="400"> </iframe>
Replace all occurrences of FACILITY_ID with your facility ID and SOURCE with any url escaped string. The width and
height of the iframe can be adjusted according to your need.
resmio does not recommend to implement the reservation widget thru an iframe.
Modify: Styling the iframe
You can style the iframe too. You have to adjust the "src"-URL and extend it by so called "GET"-Parameters.
So for example to change the background color to be black (in hex coding #000) and the font color to font color to grey (in hex coding #999) would adjust the code as shown below:
<iframe src="https://app.resmio.com/FACILITY_ID/widget?backgroundColor=%23000&color=%23999" width="275" height="400"> </iframe>
Other parameters that are honored by the widget are:
- color: The normal text color (e.g. #FFF)
- backgroundColor: The background color as valid css notation (e.g. #FFF)
- linkBackgroundColor: The color of links (e.g. #FFF)
- name: A default value for the name field
- phone: A default value for the phone field
- phone: A default value for the email field
- email: A default value for the comment field
- resourceGroup: If you want to show the availabilities only of a specific room
- nextAvailability: Allows you to jump directly to a specific day
Make sure to escape all special chars as shown in the example, e.g. the "#" becomes a "%23"