Menu Widget
The reservation widget allows you to provide end users on your website the possibility to book a spot in your restaurant. The widget can be integrated as a simple link, with HTML code or iframe directly on your website or as button that opens the widget on your website.
Preparations
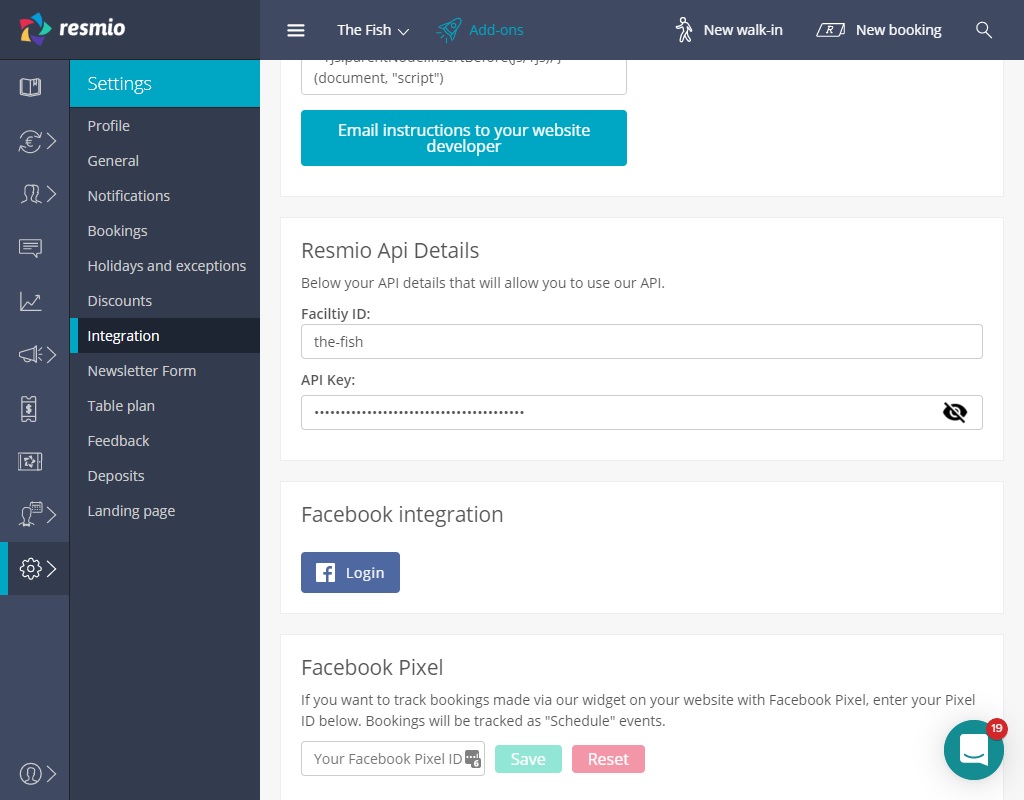
You will need your facility ID, that identifies your facility in resmio. The facility ID can be found easily. Login to
app.resmio.com and go to Settings -> Integration and scroll down to Resmio Api Details
as shown on the image below.
Integration as Link
If you want you can create and style an own link or button and then link it to your menu widget url on resmio.
The url that you will need is:
https://app.resmio.com/FACILITY_ID/menu-widget
Replace all occurrences of FACILITY_ID with your faciltiy ID.
You can also provide a source parameter to specify the source of the order if you want to include the widget on multiple websites. You can do so with the source parameter as shown below:
https://app.resmio.com/FACILITY_ID/menu-widget?source=SOURCE
Replace all occurrences of FACILITY_ID with your faciltiy ID and SOURCE with any url escaped string.
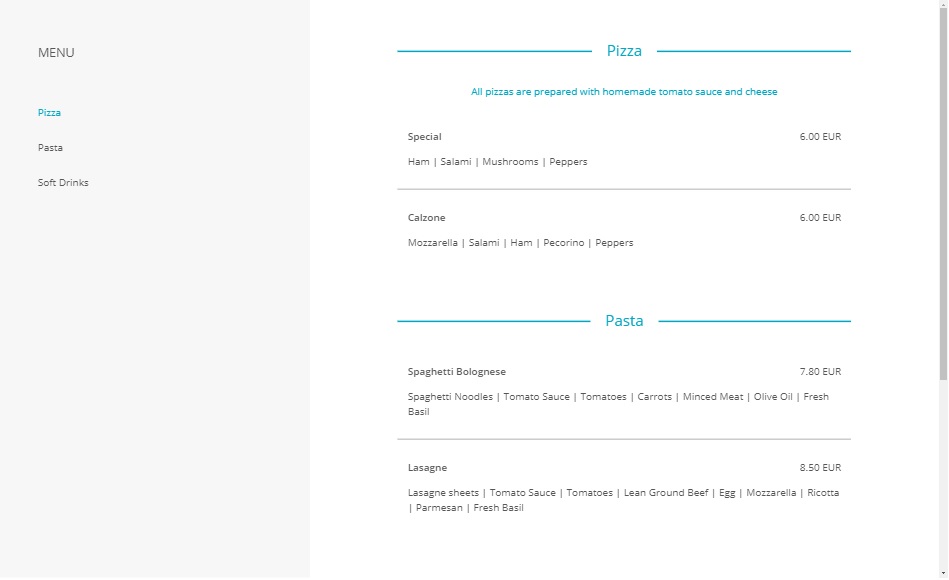
Integration as Widget
You can directly load the widget on your website. It will look like this:
Setup
You can integrate the widget with the following HTML code.
<script data-resmio-menu="FACILITY_ID" data-resmio-menu-options="theme=light&ratio=16%3A9">
(function (d) {
   var src = "//static.resmio.com/static/de/menu.js";
   var el = d.querySelector("script[src='" + src + "']");
   if (el) return;
   el = d.createElement("script");
   el.src = src;
   el.async = true;
   d.body.appendChild(el);
})(document);
</script>
Replace all occurrences of FACILITY_ID with your faciltiy ID and put that code somewhere within your
Modify: Using dark theme
The widget can be customized to use one of the two themes:
- light (default)
- dark
So for example if you adjust the script as shown below, it would use the dark theme.
<script data-resmio-menu="FACILITY_ID" data-resmio-menu-options="theme=dark&ratio=16%3A9">
...
Replace all occurrences of FACILITY_ID with your faciltiy ID.
Modify: Modify display ratio
The widget can be customized and embedded with different ratios of width and height. e.g. if you would want to show it with a 4:3 ratio, you would customize it as shown below:
<script data-resmio-menu="FACILITY_ID" data-resmio-menu-options="theme=light&ratio=4%3A3">
...
Replace all occurrences of FACILITY_ID with your faciltiy ID. The colors are in HEX representation.
Modify: Modify colors directly
If you are unhappy with the themes above, you can customize all colors with the following parameters:
- line_color: The color of all lines
- text_color: The default color of text
- error_color: The color of errors
- alert_color: The color of alerts
- primary_color: The color of category headers and the links in the left sidebar
- background_color: The background color
- gradient_top_color: The top color for the gradient
- gradient_bottom_color: The bottom color for the gradient
- menu_color: The background color of the left sidebar (this parameter requires iframe to be set to 1)
All colors here need to be in hex notation and url encoded.
<script data-resmio-menu="FACILITY_ID" data-resmio-menu-options="theme=light&ratio=16%3A9&line_color=%23CD3B1C">
...
Replace all occurrences of FACILITY_ID with your faciltiy ID.
Integration as Button
Sometimes your theme has no proper position for this menu widget. Then you can use the button integration to create a button on your website that will open the menu widget. It will look like this:
Setup
You can integrate the widget as button with the following HTML code.
<script data-resmio-menu-button="FACILITY_ID" data-resmio-menu-options="theme=light">
(function (d) {
   var src = "//static.resmio.com/static/de/menu.js";
   var el = d.querySelector("script[src='" + src + "']");
   if (el) return;
   el = d.createElement("script");
   el.src = src;
   el.async = true;
   d.body.appendChild(el);
})(document);
</script>
Replace all occurrences of FACILITY_ID with your faciltiy ID and put that code somewhere within your
Modify: Using dark theme
The widget can be customized to use one of the two themes:
- light (default)
- dark
So for example if you adjust the script as shown below, it would use the dark theme.
<script data-resmio-menu-button="FACILITY_ID" data-resmio-menu-options="theme=dark">
...
Replace all occurrences of FACILITY_ID with your faciltiy ID.
Modify: Modify colors directly
If you are unhappy with the themes above, you can customize all colors with the following parameters:
- line_color: The color of all lines
- text_color: The default color of text
- error_color: The color of errors
- alert_color: The color of alerts
- primary_color: The color of category headers and the links in the left sidebar
- background_color: The background color
- gradient_top_color: The top color for the gradient
- gradient_bottom_color: The bottom color for the gradient
- menu_color: The background color of the left sidebar (this parameter requires iframe to be set to 1)
All colors here need to be in hex notation and url encoded.
<script data-resmio-menu-button="FACILITY_ID" data-resmio-menu-options="theme=dark&line_color=%23CD3B1C">
...
Replace all occurrences of FACILITY_ID with your faciltiy ID.
Integration as iframe
Sometimes your website provider does not allow allow your custom JavaScript code on your website, then you can use an iframe to show the widget on your website. The iframe code would look like this:
<iframe src="https://app.resmio.com/FACILITY_ID/menu-widget" width="800" height="600"> </iframe>
Replace all occurrences of FACILITY_ID with your faciltiy ID. The width and height of the iframe can be adjusted according to your need.
As shown already above for the link, you can also provide a source for your orders. This is useful if you want to integrate the widget on multiple websites.
<iframe src="https://app.resmio.com/FACILITY_ID/menu-widget?source=SOURCE" width="800" height="600"> </iframe>
Replace all occurrences of FACILITY_ID with your faciltiy ID and SOURCE with any url escaped string. The width and
height of the iframe can be adjusted according to your need.
resmio does not recommend to implement the reservation widget thru an iframe.
Modify: Styling the iframe
You can style the iframe too. You have to adjust the "src"-URL and extend it by so called "GET"-Parameters.
So for example to change the background color to be red (in hex coding #CD3B1C) and the top gradeint color to font color to grey (in hex coding #999) would adjust the code as shown below:
<iframe src="https://app.resmio.com/FACILITY_ID/menu-widget?line_color=%23CD3B1C&gradient_top_color=%231CCD1C" width="800" height="600"> </iframe>
Other parameters that are honored by the menu widget are:
- line_color: The color of all lines
- text_color: The default color of text
- error_color: The color of errors
- alert_color: The color of alerts
- primary_color: The color of category headers and the links in the left sidebar
- background_color: The background color
- gradient_top_color: The top color for the gradient
- gradient_bottom_color: The bottom color for the gradient
- menu_color: The background color of the left sidebar (this parameter requires iframe to be set to 1)
Make sure to escape all special chars as shown in the example, e.g. the "#" becomes a "%23"